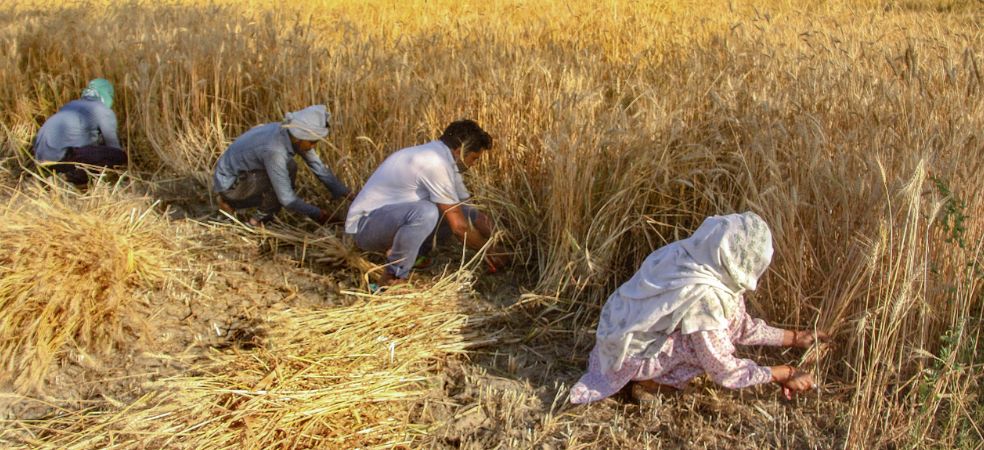
Symptoms and control of downy mildew disease in cabbage crop

Symptoms and control of downy mildew disease in cabbage crop

Symptoms of Downy mildew disease: The disease causes purple spots on the lower surface of the leaves, while on the upper surface, yellow or brown spots and hairy fungal growth are found, as well as black to brown spots or streaks on the stems. Cauliflower curd turns black both inside and outside. In the severe form of this disease, the entire plant is destroyed.

Control Measures: To control the disease, spray Novaxyl @ (Metalaxyl 8%+ Mancozeb 64% WP) @ 60 gm, Silicomaxx Gold @ 5 ml, Novamaxx (Gibberellic Acid 0.001% L) @ 30 ml per 15 litres of water.

For such important information related to the agriculture sector and farmers, do read Gramophone articles daily. If you liked today’s information then don’t forget to share it with friends.

Share

How Pseudomonas fluorescens is a beneficial bacteria

How Pseudomonas fluorescens is a beneficial bacteria

Pseudomonas fluorescens is a friendly bacterium that helps to prevent bacterial and fungal diseases that spread through the soil and air. At the same time, it also produces growth elements in plants, which helps the plant to grow and results in yield. It acts as an intra-body(Systemic) bio-control.

When Pseudomonas fluorescens is sprayed, it produces some secondary metabolites such as gibberellic, Auxins, which help the plant to remain green, and also increase resistance against stress, and disease in the plant.

We can use it through the soil application, spray, and seed process. It effectively controls diseases like root rot, stem rot, damping off, wilt, red rot, bacterial blight, etc. in the different types of crops, fruits & vegetables.

For such important information related to the agriculture sector and farmers, do read Gramophone articles daily. If you liked today’s information then don’t forget to share it with friends.

Share

Symptoms of Micronutrient Deficiency in Onions

Symptoms of Micronutrient Deficiency in Onions

In onion crops apart from nitrogen, phosphorus and potash, micronutrients are also essential, and their deficiency results in production and productivity. For example, pungency in onions is due to an element called allyl propyl disulphide. In order to increase this pungency and increase production, sulfur is required in onions.

Sulphur: All leaves young and old appear uniformly yellow, Also, in plants deficient in sulphur, the leaves lose their green color.

Manganese: The veins of the leaves turn yellow and start burning, the color of the leaves fades and they start turning upwards. Crop growth is stunted, onion bulb formation is delayed and the upper part (neck) of the bulb becomes thick.

Copper: Proper amount of copper is necessary for the development of the upper cover of bulb in onion crop. Copper deficiency causes young leaves to turn white at the tip and curl into a spiral, or curl to the right side of the plant, as well as softening of the tuber sheath, becoming pale yellow and thin.

Calcium: Calcium is an important nutrient for crop growth and storage quality. Due to its deficiency, the new leaves start drying suddenly without turning yellow, as well as the leaves become very narrow.

For such important information related to the agriculture sector and farmers, do read Gramophone articles daily. If you liked today’s information then don’t forget to share it with friends.

Share

How to protect wheat crops from mice in the store

How to protect wheat crops from mice in the store
  • Wheat crops are being harvested continuously at this time.

  • In the meantime farmers store their wheat crop in the storage shed instead of selling in the market.

  • The biggest problem in wheat storage is that of the mice.

  • To avoid this, it is very important to keep the following things in mind before storage.

  • Clean the store before keeping the wheat crop in the storage

  • If there is already an infestation of mice in the store, it is crucial to de-infest the place before storing.

  • If there is an attack of mice after wheat storage, then mice can be controlled by mixing  medicine in flour or gram flour.

Share

Symptoms and control measure of stem gall disease in coriander

Symptoms and control measure of stem gall disease in coriander

Coriander is a multi-useful spice crop. Coriander leaves and seeds are both useful. Stem gall disease is very harmful in coriander crops, this disease is caused by a fungus called Protomyces macrosporus.

Symptoms of Stem gall Disease: Galls appear on the leaves and stems of plants affected by this disease. Even before flowering, the pathogenic fungus attacks the soft branches and twists their top part. Also, the infected part swells, as well as small tumour-like swellings appear on the stem near the ground. Initially, it appears shiny but later splits and becomes hard, and in advanced infection, these pustules (swellings) are also formed on the upper part of the stem. When the attack occurs in the inflorescence, seed production is reduced.

Control: To reduce stem gall disease, maintain optimum moisture, and destroy diseased crop residue by burning. treat the seed with Bavistin (Carbendazim 50% WP) @ 2 g/kg before sowing. If symptoms appear in standing crops, spray Novacone (Hexaconazole 5% SC) @ 400 ml/acre with Monas Curb (Pseudomonas fluorescens) @ 250 g/acre in 150 to 200 litres of water.

For such important information related to the agriculture sector and farmers, do read Gramophone’s articles daily. If you liked today’s information then don’t forget to share it with friends.

Share

Farmers will get good profits by cultivating these improved varieties of Okra

Advanced varieties of Okra whose cultivation will give good yield
  • Today we are discussing some of the main types of  okra varieties, these are as follows 

  • GOLDEN | RADHIKA ,MAHYCO | NO 10 |, NUNHEMS | SINGHAM | 7000 SEEDS

  • Plant type:- Medium in size,  cut leaves

  • Branches 2 to 4 and First harvest 45 – 51 days after sowing

  • Fruit length 12 to 14 cm or  12 to 16 cm  and diameter 1.5 to 1.8 cm with 5 ridges,

  • Fruit weight 12 to 15 grams or 12 to 25 grams Dark green with good shelf life.

For such important information related to the agriculture sector and farmers, do read Gramophone articles daily. If you liked today’s information then don’t forget to like and share.

Share

Accelerate crop growth with the third generation growth booster Jiva Maxx

Accelerate crop growth with the third generation growth booster Jiva Maxx

Jiva Maxx Is A Well Balanced Stimulated Chlorophyll Product Of 3Rd Generation PGR And Hydrolyzed Protein Complex. This Product Is Used For Vegetative Growth And Works To Increase Whiter Roots And Enhance Fruit Quality, Better Fruit Production. Works To Increase Nutrient Uptake And Metabolic Activity In Crops.

Doses

Spraying: 2 ml per litre of water

Drip: 500 ml per acre.

Seed treatment: 2 ml per kg of seed.

For such important information related to the agriculture sector and farmers, do read Gramophone articles daily. If you liked today’s information then don’t forget to share.

Share

Main field preparation and nutrition management for rabi paddy crop

Main field preparation and nutrition management for rabi paddy crop

For paddy transplantation, while preparing the main field, 1 or 2 days before ploughing, apply FYM @ 4 Ton Speed ​​Compost @ 4 kg Combat – Trichoderma viride 1.0 % WP @ 2 kg per acre evenly with fertiliser, and fill the field with water and allow the water to soak.

Keep the depth of water at 2.5 cm at the time of ploughing. For paddy crop, first ploughing should be done with soil turning plough and 2-3 ploughing should be done with a cultivator, after After this, puddle the field and make it uniform, due to which the normal depth of water is maintained in the area.

Nutrition management: On the transplanting day in mud add Urea- 20 kg SSP- 50 kg, DAP- 25 kg, MOP- 20 kg, and Paddy Samriddhi Kit- 11 kg, Ingredients included in the kit (Tri-Coat Max @ 4 kg TB3 – @ 3 kg Taba G @ 4 kg) mix all these together and spread evenly on the one-acre area. Also for planting the seedling, keep row to row and plant to plant distance of 20 x 15 cm.

Share

Know about field preparation and nutrition management for rabi paddy cultivation!

Know about field preparation and nutrition management for rabi paddy cultivation

Even in the rabi season, direct sowing of paddy is done by puddle soil in many places. So let’s know how to prepare the field and germinate and treat the seeds before sowing!

How to germinate paddy seed

First of all, the variety that has been chosen for sowing, immerse it in water in a vessel, stir it well after immersing it, so that the bad seed will float on top, take out the bad seed from the vessel, and Soak the seed for 18 – 20 hours in water and kept in shade, after completion of 18 to 20 hours, take out the paddy in gunny bags or clean cotton cloth, and as a seed treatment, apply Sprint (Carbendazim 25% + Mancozeb 50% WS) @ 35 gm per 10 kg of seed, broadcast evenly and mix well in the seed, and cover well with a straw or gunny bag, to maintain proper moisture, Keep spraying light water from time to time so that germination is good. On getting sufficient moisture and temperature, good germination will take place in 24 hours. Then after levelling it, sow it evenly in the prepared land. And if there is excess water in the field, remove it from the field.

Field preparation

  • For wet direct seeding of paddy, at the time of field preparation, 2 days before ploughing,  FYM @ 4 Ton + Speed Kompost @ 4 kg + Combat – Trichoderma viride 1.0 % WP @ 2 kg per acre broadcast uniformly And fill the field with water and let to soak.

  • Keep the depth of water at 2.5 cm at the time of ploughing. For paddy crops, do first ploughing with soil turning plough and do 2-3 ploughing with a cultivator. Puddled the field well and level the field by using a leveller.

  •  In the mud on the day of sowing, SSP- 50 kg + DAP- 25 kg + MOP- 20 kg + Paddy Samridhhi Kit – 11 kg, contains in the kit (Tri-Coat Maxx @ 4 kg + TB-3 @ 3 kg + Taba G – @ 4 kg), all mixed together and broadcast uniformly in one-acre area, mix the manure well in the mud by using a leveller and sow the seeds as well as drain out the excess water.

Benefits of sowing

  • 25% of labour is saved in this.

  • It gets ready by ripening 7 to 10 days earlier than the planting method.

  • There is no need to raise a nursery and transplant, in direct sowing.

For such important information related to the agriculture sector and farmers, do read Gramophone’s articles daily. If you liked today’s information then don’t forget to share.

Share

Before sowing Watermelon and Muskmelon, keep these things in mind while preparing the field!

Watermelon and Muskmelon field preparation

Land preparation: For sowing watermelon and Muskmelon, sandy and sandy loam soil are best. For the good growth and root development of the plants, it is necessary for the soil to be friable. Generally, the first ploughing is done with soil turning plough and after that, apply FYM @ 4 Ton + Speed ​​Kompost 4 kg + Neem cake @ 100 kg, per acre evenly in the field. And do 2-3 ploughing with the help of a harrow. Remove other unwanted material present in the field, if the moisture in the soil is less, then irrigate first, then prepare the field, and at last make the field level by level.

Nutrient management: At the time of crop transplanting/ sowing, DAP 50 kg + Boronated SSP Granular 75 kg + MOP 75 kg + Multi Zinc (Zinc Sulphate 10 kg) + Magnesium Sulphate 10 kg + Watermelon/Muskmelon Samriddhi Kit – TB3 (NPK Consortia) @ 3 kg + Taba G (Zinc Solubilizing Bacteria) @ 4 kg + Tri-Coat Maxx  (Seaweed, Amino, Humic) @ 4 kg + Combat (Trichoderma viride 1.0 % WP) @ 2 kg, @ 13 kg, mix all together and broadcast evenly one acre.

For such important information related to the agriculture sector and farmers, do read Gramophone’s articles daily. If you liked today’s information then don’t forget to share it with friends.

Share