- Do not take samples from the land under the tree, from the meds or the low places, where there is a pile of manure, or where water gets collected.
- For soil testing, take the sample in such a way that it represents the entire field, at least 500 grams of the sample must be taken.
- Remove organic materials such as crop residue, dry leaves, stalks and grasses etc. from the top surface of the soil and choose samples from 8-10 different locations according to the area of the field.
- Soil sampling should be done from the depth at which the root crop is taken.
- Soil samples should be collected in a clean bucket or tagari etc.
- Make sure to label the sample precisely.
Process of taking sample for soil testing
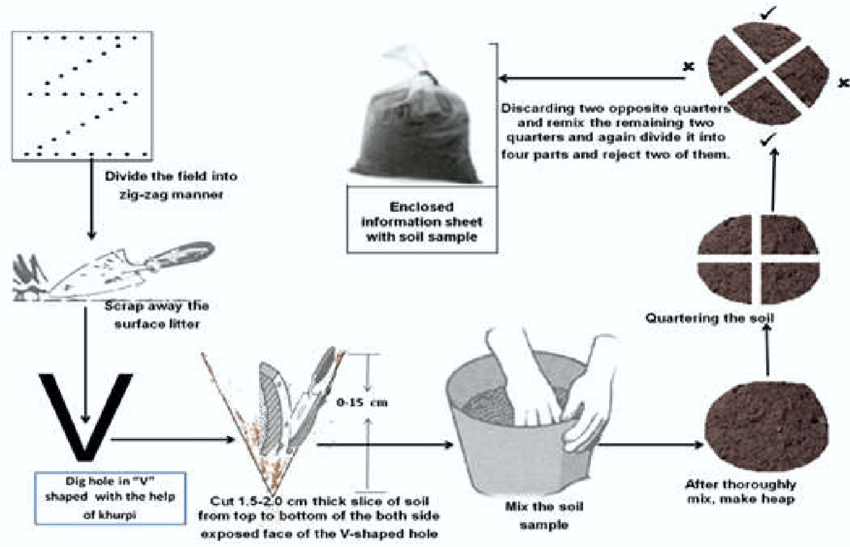
- For soil testing, the sample should be taken in such a way that it represents the complete area or field. At least 500 grams of the sample must be taken for soil testing.
- Remove organic materials such as twigs, dry leaves, stalks and grasses etc. from the top surface of the soil, and choose samples from 8-10 locations according to the area of the field.
- At selected locations, make a V-shaped hole of around 10-15 cm in shallow root crops and 25-30 cm depth for deep root crops.
- Then cut a uniform layer of soil of about one-inch thickness and collect it.
- Similarly, take samples from other parts of farms too. Now mix this samples of soil and divide it into four parts.
- Now remove two facing parts from this sample as shown in the image, and make a pile of the remaining part. Keep repeating the same process until you are left with only half kilogram of soil sample.
- Put this soil sample in polyethene and label it.
- For labelling, write the name of the farmer, location of the field, date of soil sampling and the name of the previous, present crop as well as the crop you are planning to sow next.
Please watch this video for more information about soil sampling –
Share

